Posts

Showing posts from November, 2018

How to draw star in 3d on paper-step by step tutorial by Art of Rohit

Image
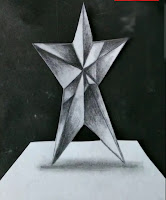
How to draw Star in 3d-step by step tutorials by Art of Rohit Hello friends,today we will going to learn about how to draw star in 3d on paper. Here step by step tutorial for you to draw star in 3d on paper. Before going to start we need this drawing tools for drawing.  Drawing tools we need 1.Graphite pencils-2b,4b,6b,8b 2.Paper stumps 3.Scale 4.Kneaded eraser 5.White paper        Important points we must remember Now friends these are some important points we must remember when we draw the star. •Pick good reference image for drawing ,So it's give us realistic 3d drawing . •Try to give shiny texture to the star. •Use kneaded eraser for to give shiny effects. •Use darker grade pencils for to highlight the details of star. So After remembering these points let's start. 1.First step:Draw outline of star according to your reference image. Here I am drawn outline by the using of 2b graphite pencil with the help of scale. Now let's proceed for another second step 2.Second step:

How to draw modern design Cup and Saucer-step by step tutorial

Image
Modern Cup Design Drawing - step by step tutorial by Art of Rohit Hello friend's, here step by step tutorial for to draw cup and saucer in modern design and from this tutorial you will easily get to know about that how to give smooth shade to any object. The main purpose for to make this tutorial is that by following these steps you will easily able to draw any cup or saucer in modern design. So without wasting time let's start.                   Drawing tools we need 1.Graphite pencils- 2b,4b,6b,8b 2.Paper stumps 3.Scale for outlines 4.White paper                          Important points These are some important points we must remember when we draw the cup and saucer. •First we must remember that when we start  to draw we need to draw outline in accurate manner. •Second is we need to use the paper stumps for to blend the surface area of cup and saucer for smooth texture. •Third point is we need to use darker pencils at last for highlighting the details of cup and saucer drawi

How to draw 3d hole on paper by Art of Rohit

Image
How to draw 3d hole on paper step by step by ArtofRohit Hello friends,here step by step tutorials for to draw 3d hole on paper. We will draw it with the help of one point perspective method and try to give shadow effect for the square or rectangular boxes.So let's start Stationery tools we need: 1.Graphite pencils -2b,4b,6b,8b 2.Black marker 3.Scale  4.Blendings stumps 5.White paper                                         Important points:   These are some important points we must remember when we going to draw 3d hole.First we need to make the structure of the wall or boxes by using one point perspective method. Second we need to give shadow shade for the boxes from certain angle so it's help us to make it realistic drawing. Another important point is we need to sketch the hole with the black marker so it's look deep. After remembering these we can proceed for to draw the 3d hole drawing. 1.First step: we draw square coloumns on paper with the help of scale. Here we are

How to draw wooden house scenery drawing step by step tutorials

Image
How to draw Wooden House scenery on paper with graphite pencils step by step by ArtofRohit Hello friends,here step by step tutorial and guidance for to draw the wooden  house scenery drawing. For to draw the house select the reference house picture otherwise create  house structure in your mind with  your own creativity. Here we will going to draw thiswooden house scenery drawing.                      Things we need : 1. Drawing graphite pencils- 2b,4b,6b,8b  2. Charcoal pencils soft 3. Blending stumps and tissue papers 4. White paper                       Important points Some important points we must remember when we going to draw. Here are these points: •Draw the  outline with light grade pencils  •Draw sky clouds with the help of darker pencils. •Try to give wooden texture shade on roof and wall with the help of pencils when we draw wooden house •Realise all the details of house and  draw the details with the pencil 1. First we will draw the outline of wooden house by using 0.5 or

How to draw wooden texture on house by using graphite pencils

Image
How to draw wooden texture on house by using graphite pencil by Artofrohit Hello guys,here step by step tutorial for to draw wooden texture on house by using graphite pencils on paper. Before going to draw the wooden texture on house we need these things or tools: 1.Graphite pencils-2b,4b,6b,8b 2.Blending stumps or tissue papers 3.Scale  4.White paper We draw the house structure by using scale or pencils and give wooden shape to the wall&roof of house.Try to draw the house walls in recantuglar shapes and it gives shape of wooden ply. Before going to start drawing the wooden texture of house remember these points. Important points Some points you must remember is to draw the house with the help of scale so it became easy to draw the shape of wood and wood came in proper shape. Use 4b and 6b for darker shades. Guys these are important points which must be followed to draw proper wooden texture Guys after knowing important facts let's start the step by step process to draw the woo

How to draw Jawaherlal Nehru step by step

Image
JAWAHERLAL NEHRU Potrait Drawing -step by step by Art of Rohit Drawing potrait sketch of Jawaherlal Nehru on paper size29.7x21cm with the pencil of 0.5bpencil for to draw outline and 2b,4b,6b pencils  for to shading  and 8b or 10b pencils for highlighting the darker areas like eyebrows ,lips,hairs and in some areas of ears for darker shades and use blending stumps for to blend the shading areas.It will helps us to make our potraits drawing more professional .Now here is step by step tips and tricks for to draw potrait sketch of Jawaherlal Nehru. •First step-Draw outline of your reference image of potrait. Draw outline by using 0.5 or 0.7 graphite pencil or by mechanical pencil with the help of grid method •Second step-Draw darker areas of eyes by using 8b or 6b  graphite pencil according to the refrence image.  •Third step-Blend the darker areas with the help of blending stumps and try to match with the reference image and draw the darker areas with 10b pencil. •Fourth step-Draw eye