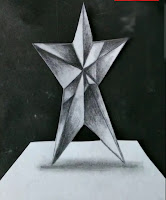
How to draw star in 3d on paper-step by step tutorial by Art of Rohit
How to draw Star in 3d-step by step tutorials by Art of Rohit
Hello friends,today we will going to learn about how to draw star in 3d on paper. Here step by step tutorial for you to draw star in 3d on paper. Before going to start we need this drawing tools for drawing.
Drawing tools we need
1.Graphite pencils-2b,4b,6b,8b
2.Paper stumps
3.Scale
4.Kneaded eraser
5.White paper
Important points we must remember
Now friends these are some important points we must remember when we draw the star.
•Pick good reference image for drawing ,So it's give us realistic 3d drawing.
•Try to give shiny texture to the star.
•Use kneaded eraser for to give shiny effects.
•Use darker grade pencils for to highlight the details of star.
So After remembering these points let's start.
1.First step:Draw outline of star according to your reference image. Here I am drawn outline by the using of 2b graphite pencil with the help of scale. Now let's proceed for another second step
 |
2.Second step:In these steps friend we will draw the line to centre of star according to the reference image from the cone point. The main purpose to draw this lines is to 3d shape to star. After doing this we will proceed for next step.
3.Third step: Draw the surface area of star with the help of 4b or 6b pencil. First we will draw with 4b pencils for lighter shades and add darker shades by drawing with 4b pencils according to the reference image. Here friends darker pencils plays major role in making our drawing realistic.
4.Fourth step: Blending the star surface area with the help of paper stumps. It will help us to give smooth surface area for star. You can also use tissue papers for blending purpose. Now it will start to look in 3d realistic.
5.Fifth step: In this step friend's we will using kneaded eraser for to give shiny effects to the star. It will make our drawing more realistic.
Always add shiny effects according to your reference image.


Comments
Post a Comment